Until recently I had never set up a Substack account. Sure, I’d been on Substack and consumed a fair bit of information from the platform, but I never ventured into setting one up. A client wanted me to provide some SEO advice for a recently launched Substack of theirs and I thought, “Sure, why not?”
It took me 30 seconds to realize that their Substack hadn’t even been indexed yet by Google, so after finding out they didn’t have Google Tag Manager, Google Analytics, or Google Search Console installed, I figured I’d better get all of those set up. In particular, Search Console so I could submit their XML, home page, and existing posts to Google’s index so they would at least have a chance to start ranking.
I’ve been doing this stuff for 20 years, I figured I’d just do a quick Google search to find the path of least resistance for setting these tools up and I was surprised with what I found.
A giant black hole of nothing
Seriously. It’s the back half of 2023 and the only how-to I could find on verification used a method that Substack no longer supports. Not that the process is decidedly different than how we do it for nearly any other web platform these days, but for a beginner without much experience setting up Google tools, this was going to be a problem. So, in an effort to be a good citizen of the internet, I guess I’ll make some tutorials. I would highly suggest you do all three of these in order so you have access to all of these great tools down the road. Here’s what I’m going to show you.
- How to set up Google Tag Manager on Substack
- How to set up Google Analytics on Substack
- How to set up Google Search Console on Substack
How to set up Google Tag Manager on Substack
First, make sure you have a Google account and are logged into Google. DO NOT LOSE THIS ACCOUNT OR YOUR LOGIN INFORMATION. Seriously. Don’t lose it. Burn the username and password into your brain, or use a secure password saving tool. Just don’t lose it or you’ll want to kick yourself.
Okay, now that I’ve got that disclaimer out of the way, go ahead and go to the Google Tag Manager site and click the Create Account button.

My demo Substack account is adamhenige.substack.com so that’ what we’ll use for our example here. Go ahead and fill out all the pertinent fields, choosing “Web” for your target platform.

After that you’ll accept the service terms and then you’ll get a pop up providing you with code to install. Fortunately, you won’t need this to set up Tag Manager in Substack. So you can just select OK and move on to the next step.

What you will need is the Google Tag Manager ID. You can find this along the upper right header of your Tag Manager screen. It will always start with “GTM-“

Armed with this useful information, you can now move over to Substack and navigate to Dashboard > Settings > Analytics. Once you get to the settings page, you can find Analytics listed along the left hand of the page in that subnavigation. 
In the middle of the page you’ll see the “Advertising Analytics section and you can paste your GTM ID in that field.
Select “Save” and there you have it, you’ve successfully installed Google Tag Manager!
Cool, but what does Google Tag Manager do exactly?
Without getting too deep into it, Tag Manager essentially gives you singular window with which to insert code and run scripts into your site. Rather than messing around with your site’s code, you can just use GTM as a one stop shop for inserting analytics code, setting up event tracking, or even adding structured data where you want it throughout a website. It’s quite handy once you know how to use it. However, that’s probably more than you need to know for our purposes here. We’re simply going to use it to set up Google Analytics 4 next.
How to set up Google Analytics 4 in Substack
There are actually two methods for doing this, I’ll show you both. But, since we already set up Tag Manager, let’s start with that route first. We’ll actually insert the Google Anaytics tracking code using Tag Manager. First, you’ll need to go to Google Analytics and set up a property for your Substack.
Google will ask you a bunch of information about how you’re using it, and you just need to follow along and answer all the questions. In order, I’ll show you what they ask and what the answers are for my Demo substack, so you can answer the same or similarly.
- Account name: Adam’s Substack
- Account data sharing settings: Do what you want here, I just make sure to uncheck Account specialists because Google will annoy you to death if you let them
- Property details
- Property name: Adam’s Substack
- Time zone: United States/Detroit time (I’m EST)
- Currency: US Dollar
- Business details
- Industry category: Other Business Activity
- Business size: Small
- Choose your business objectives: Get baseline reports
- At this point you need to accept Google Analytics’ Terms of Service Agreement.
- Start collecting data: Select “Web”
- Set up your web stream
- https://adamhenige.substack.com (use your substack URL here obviously)
- Stream name: Adam’s Substack
- Select “create stream”
At this point you’ll get an installation instructions window that will look like this.

You can close out of that window and navigate to Admin > Data Streams and then click on the stream you just created, for me that’s “Adam’s Substack.”
Here you’ll see a measurement ID like the one highlighted below.

You’ll need this to create your Tag Manager tag that will run Google Analytics.
So, now you’ll need to head back over to Tag Manager and create this new tag. You’ll need to be in your Workspace and click on Tags in the left column, followed by New in the upper right hand corner, as highlighted below.

Your next steps will be to name your tag in the upper left corner where it says “Untitled Tag” – I just go with something simple like “GA4 Configuration” and then you click in the tag configuration window and you’ll get to choose your tag type.
- Select Google Analytics
- Select Google Tag
- Here you will paste your Measurement ID into the “Tag ID” field
- Then, click into the Triggering field and you’ll have the option to select All Pages
- At this point, your screen should look something like what you see below

Now, select save and you’ll be brought back out to your work space. Click “Submit” and then you’ll be brought to your publishing screen, name this new version of your Tag Manager, I do something simple like what you see below, and then hit “Publish.”
There might be a bit of delay before you’ll see data in GA4, but within 24 hours, you should have data flowing.

The second option, if you don’t want to deal with Tag Manager, is to input your GA4 measurement ID directly into Substack. In that same Analytics section we were working with previously, found at Dashboard > Settings > Analytics.
Just pop in your Measurement ID, starting with a “G-” and hit save. That will also do the trick.

How to set up Google Search Console in Substack
The reason Search Console is last in this list is the only way to get it to work is by setting up Tag Manager and/or Analytics first. Search Console requires that you verify yourself, and they do so by seeing if you were able to install those other items on your Substack first. So, here’s the process.
- Navigate to Search Console, logged into the same account you have for Tag Manager/GA4
- You’ll need to select Start now if you’ve never set up a property before
- Once you’re technically in Search Console you’ll have the ability to add a property, which will then bring you to a screen asking for information on your domain. For Substack, you can only use the URL prefix version, so fill it out using your Substack address, just like I’ve done with my demo account below

- Select Continue and then you’ll see your options for verifying your ownership
- Depending on what you have set up, you can either use the Google Analytics or Google Tag Manager options
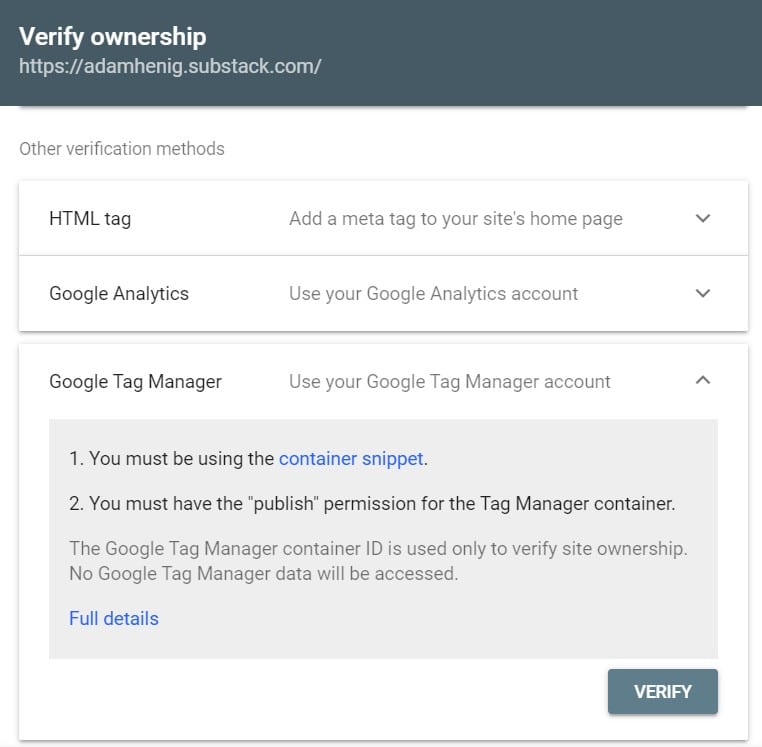
One thing I learned the hard way here is that there seems to be a lag between Substack and Google Search Console. So, your verification might not work the same day that you set up Tag Manager or Analytics. Don’t freak out if this doesn’t work right away, just give it 24 hours or some and come back and try again and you should be good to go.
The world is your oyster
Now you should have all the Google data and analytics tracking abilities you need to take your Substack to the next level. If this is still more than you care to handle, or you need the help of seasoned SEO professionals, get in touch with our team here at Netvantage and we’ll be happy to discuss how we can work together.
Leave a Reply